Customizing a k3s Kubernetes Cluster
Equip our cluster with load balancing and persistent storage.
In the last blog we completed the installation of k3s on our cluster. Technically we are now good to start deploying applications (e.g. from docker hub). As it stands however, the cluster lacks the capabilities to
- load balance incoming requests to multiple container instances and to expose services outside of the cluster
- provide containers with persistent storage
We will address these issues in the following paragraphs of this blog.
- Installing the Helm Package Manager
- Installing the MetalLB Load Balancer
- Installing the Longhorn Storage Manager
- Configuring our SSD Volumes
Installing the Helm Package Manager
Some of the components we are going to install in this Blog come packaged as Helm Charts. In order to install them, we have to install Helm first.
# curl https://raw.githubusercontent.com/helm/helm/main/scripts/get-helm-3 | bash
  % Total    % Received % Xferd  Average Speed   Time    Time     Time  Current
                                 Dload  Upload   Total   Spent    Left  Speed
100 11715  100 11715    0     0   200k      0 --:--:-- --:--:-- --:--:--  204k
Downloading https://get.helm.sh/helm-v3.12.3-linux-arm64.tar.gz
Verifying checksum... Done.
Preparing to install helm into /usr/local/bin
helm installed into /usr/local/bin/helm
Conceptually Helm is an abstraction layer around the Kubernetes API and requires authentication credentials for submitting API requests. The procedure for that is simple : Add this export statement to root’s ~/.bashrc on the master node:
export KUBECONFIG=/etc/rancher/k3s/k3s.yaml
If you miss this last step, you will run into errors like this :
# helm list
Error: Kubernetes cluster unreachable: Get "http://localhost:8080/version": dial tcp [::1]:8080: connect: connection refused
Installing the MetalLB Load Balancer
Metallb provides a network load-balancer implementation. It allows you to create Kubernetes services of type LoadBalancer that are visible outside of the cluster. It has two features that work together to provide this service: address allocation, and external announcement.
Reserving External Cluster IP Addresses
Since the external addresses assigned by MetalLB come out of the address range managed by my dnsmasq DHCP service, i have to ensure that dnsmasq does not use them.
This is the dhcp-range clause from /etc/dnsmasq.conf that ensures that dnsmasq only assigns addresses from 192.168.100.[1..149] and 192.168.100.[200..255]. Addresses in the range 192.168.100.[150..199] are reserved for MetalLB.
# assign an address from one of the ranges below
# assign lease expiry times for each address range
# either use a tagged range or the untagged default
dhcp-range=192.168.100.1,192.168.100.149,24h
dhcp-range=192.168.100.200,192.168.100.254,24h
Address Allocation
The IP Address Pool definition below ties into my dnsmasq configuration from above. MetalLB LoadBalancer services are immediately visible in my network.
cat > ./ipaddresspool.yaml << EOF
apiVersion: metallb.io/v1beta1
kind: IPAddressPool
metadata:
  name: default-pool
  namespace: metallb-system
spec:
  addresses:
  - 192.168.100.150-192.168.100.199
EOF
External Announcement
After MetalLB has assigned an external IP address to a service, it needs to make the network beyond the cluster aware that the IP “lives” in the cluster. MetalLB uses standard networking or routing protocols to achieve this. The L2Advertisement object instructs MetalLB which addresses are in scope of advertising.
cat > ./advertisement.yaml << EOF
apiVersion: metallb.io/v1beta1
kind: L2Advertisement
metadata:
  name: l2-ip
  namespace: metallb-system
spec:
  ipAddressPools:
  - default-pool
EOF
Create the objects with ‘kubectl apply’ :
kubectl -n metallb-system apply -f ./ipaddresspool.yaml -f ./advertisement.yaml
Now we are ready to install MetalLB. We are going to use a Helm Chart for installation.
Install metallb with the helm command below
helm --namespace metallb-system install --create-namespace metallb metallb/metallb
Verify that the installation was successful :
$ kubectl -n metallb-system get all
NAME                                      READY   STATUS    RESTARTS       AGE
pod/metallb-speaker-98j28                 4/4     Running   76 (30h ago)   29d
pod/metallb-controller-6cb58c6c9b-7xdx6   1/1     Running   31 (30h ago)   29d
pod/metallb-speaker-zfsvg                 4/4     Running   81 (30h ago)   29d
pod/metallb-speaker-t9qfm                 4/4     Running   89 (30h ago)   29d
pod/metallb-speaker-qjvhd                 4/4     Running   76 (30h ago)   29d

NAME                              TYPE        CLUSTER-IP      EXTERNAL-IP   PORT(S)   AGE
service/metallb-webhook-service   ClusterIP   10.43.125.243   <none>        443/TCP   29d

NAME                             DESIRED   CURRENT   READY   UP-TO-DATE   AVAILABLE   NODE SELECTOR            AGE
daemonset.apps/metallb-speaker   4         4         4       4            4           kubernetes.io/os=linux   29d

NAME                                 READY   UP-TO-DATE   AVAILABLE   AGE
deployment.apps/metallb-controller   1/1     1            1           29d

NAME                                            DESIRED   CURRENT   READY   AGE
replicaset.apps/metallb-controller-6cb58c6c9b   1         1         1       29d
DNS Resolution of LoadBalancer Services
Since the address pool set aside for MetalLB is not that large i intend to assign addresses only to essential services. These are going to be virtually static, so it is feasible to just add them to the /etc/dnsmasq.hosts file of my dnsmasq service and give it responsibility for address resolution.
This is the list of services that are currently assigned ip addresses from the pool :
##
#	k3s kubernetes cluster
##
192.168.100.150 ingress.k3s.kippel.de
192.168.100.151 longhorn.k3s.kippel.de
192.168.100.152 dashboard.k3s.kippel.de
192.168.100.153 registry.k3s.kippel.de
192.168.100.154 prometheus.k3s.kippel.de
192.168.100.155 git.k3s.kippel.de
192.168.100.156 registry-ui.k3s.kippel.de
192.168.100.157 minio-browser.k3s.kippel.de
excerpt from dnsmasq.hosts
Installing the Longhorn Storage Manager
k3s comes with the ‘local storage’ provider by default. The problem with local storage is that in case one of the client nodes fails, all persisted volumes from that node would be gone. Longhorn remediates this risk by replicating the volumes within the cluster.
Prerequisites
Longhorn uses iscsi to manage volumes as block level devices, so we have to install iscsi.
sudo apt-get install -y open-iscsi
For the installation we grab the required object definitions from the Longhorn website and apply them with kubectl.
# kubectl apply -f https://raw.githubusercontent.com/longhorn/longhorn/v1.5.1/deploy/longhorn.yaml

namespace/longhorn-system created
serviceaccount/longhorn-service-account created
serviceaccount/longhorn-support-bundle created
configmap/longhorn-default-setting created
configmap/longhorn-storageclass created
customresourcedefinition.apiextensions.k8s.io/backingimagedatasources.longhorn.io configured
customresourcedefinition.apiextensions.k8s.io/backingimagemanagers.longhorn.io configured
customresourcedefinition.apiextensions.k8s.io/backingimages.longhorn.io configured
customresourcedefinition.apiextensions.k8s.io/backups.longhorn.io configured
customresourcedefinition.apiextensions.k8s.io/backuptargets.longhorn.io configured
customresourcedefinition.apiextensions.k8s.io/backupvolumes.longhorn.io configured
customresourcedefinition.apiextensions.k8s.io/engineimages.longhorn.io configured
customresourcedefinition.apiextensions.k8s.io/engines.longhorn.io configured
customresourcedefinition.apiextensions.k8s.io/instancemanagers.longhorn.io configured
customresourcedefinition.apiextensions.k8s.io/nodes.longhorn.io configured
customresourcedefinition.apiextensions.k8s.io/orphans.longhorn.io configured
customresourcedefinition.apiextensions.k8s.io/recurringjobs.longhorn.io configured
customresourcedefinition.apiextensions.k8s.io/replicas.longhorn.io configured
customresourcedefinition.apiextensions.k8s.io/settings.longhorn.io configured
customresourcedefinition.apiextensions.k8s.io/sharemanagers.longhorn.io configured
customresourcedefinition.apiextensions.k8s.io/snapshots.longhorn.io configured
customresourcedefinition.apiextensions.k8s.io/supportbundles.longhorn.io configured
customresourcedefinition.apiextensions.k8s.io/systembackups.longhorn.io configured
customresourcedefinition.apiextensions.k8s.io/systemrestores.longhorn.io configured
customresourcedefinition.apiextensions.k8s.io/volumes.longhorn.io configured
customresourcedefinition.apiextensions.k8s.io/volumeattachments.longhorn.io configured
clusterrole.rbac.authorization.k8s.io/longhorn-role unchanged
clusterrolebinding.rbac.authorization.k8s.io/longhorn-bind unchanged
clusterrolebinding.rbac.authorization.k8s.io/longhorn-support-bundle unchanged
service/longhorn-backend created
service/longhorn-frontend created
service/longhorn-conversion-webhook created
service/longhorn-admission-webhook created
service/longhorn-recovery-backend created
service/longhorn-engine-manager created
service/longhorn-replica-manager created
daemonset.apps/longhorn-manager created
deployment.apps/longhorn-driver-deployer created
deployment.apps/longhorn-ui created
Longhorn Installation Log
Exposing the Longhorn Dashboard
We are going to create a load balancer service that exposes the Longhorn Dashboard outside of the cluster.
#file: 'longhorn-loadbalancer-service.yaml'
cat >./longhorn-loadbalancer-service.yaml <<EOT
apiVersion: v1
kind: Service
metadata:
  labels:
    app: longhorn-lb
  name: longhorn-lb
  namespace: longhorn-system
spec:
  type: LoadBalancer
  ports:
  - name: longhorn-http
    port: 80
    protocol: TCP
    targetPort: 8000
  selector:
    app: longhorn-ui
EOT

kubectl -n longhorn-system apply -f ./longhorn-loadbalancer-service.yaml
MetalLB assigns the load balancer service another ip address from its address pool.
# kubectl -n longhorn-system get service
NAME                          TYPE           CLUSTER-IP      EXTERNAL-IP       PORT(S)        AGE
longhorn-lb                   LoadBalancer   10.43.37.142    192.168.100.151   80:30979/TCP   29d
Now the URL http://192.168.100.151 should open the Longhorn Dashboard from anywhere in your network.
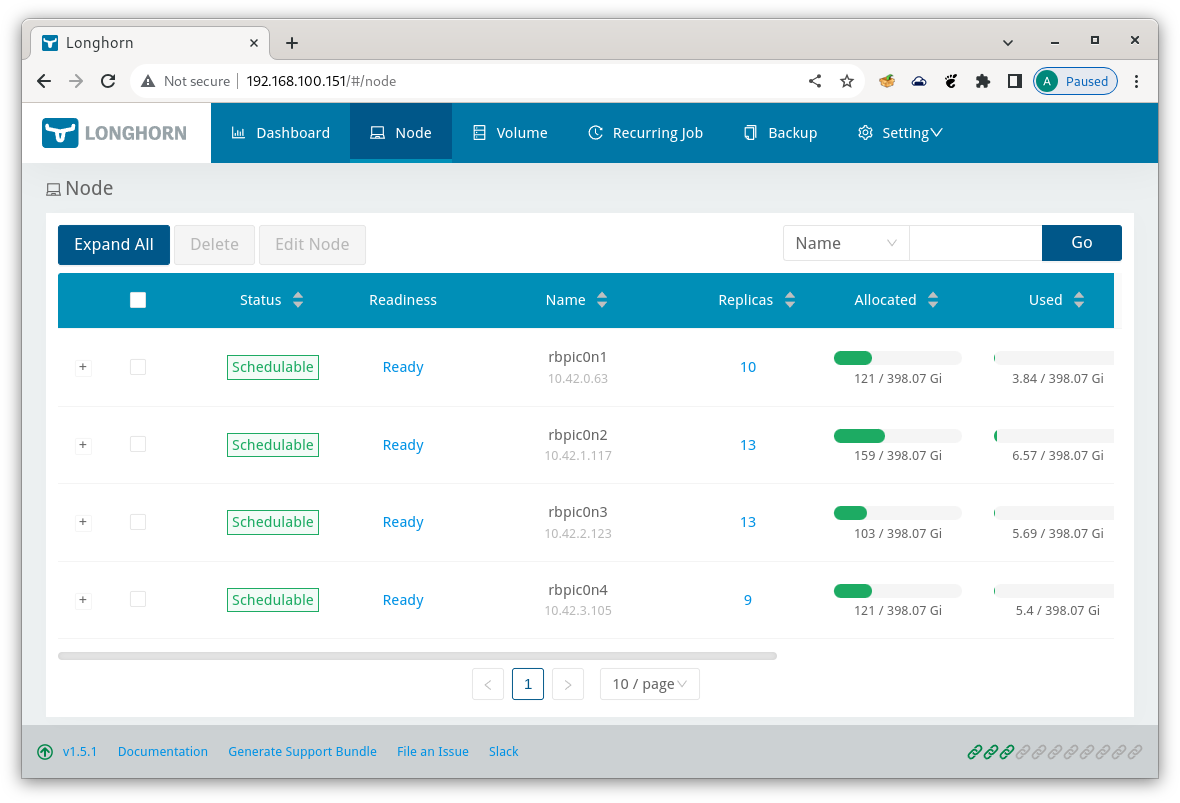 Longhorn Dashboard
Configuring our SSD Volumes
If you are content to have Longhorn manage persistent volumes on the SD Card you booted the node from, you can safely skip this step.
For my configuration i wanted to make Longhorn use the 400GB partitions from the attached SSDs. I could not find a way to add disks to Longhorn from the commandline, so i had to select ‘Operations/Edit node and disks’ for every cluster node in the Longhorn Dashboard. Hit ‘Add Disk’ at the bottom and then fill in the form.
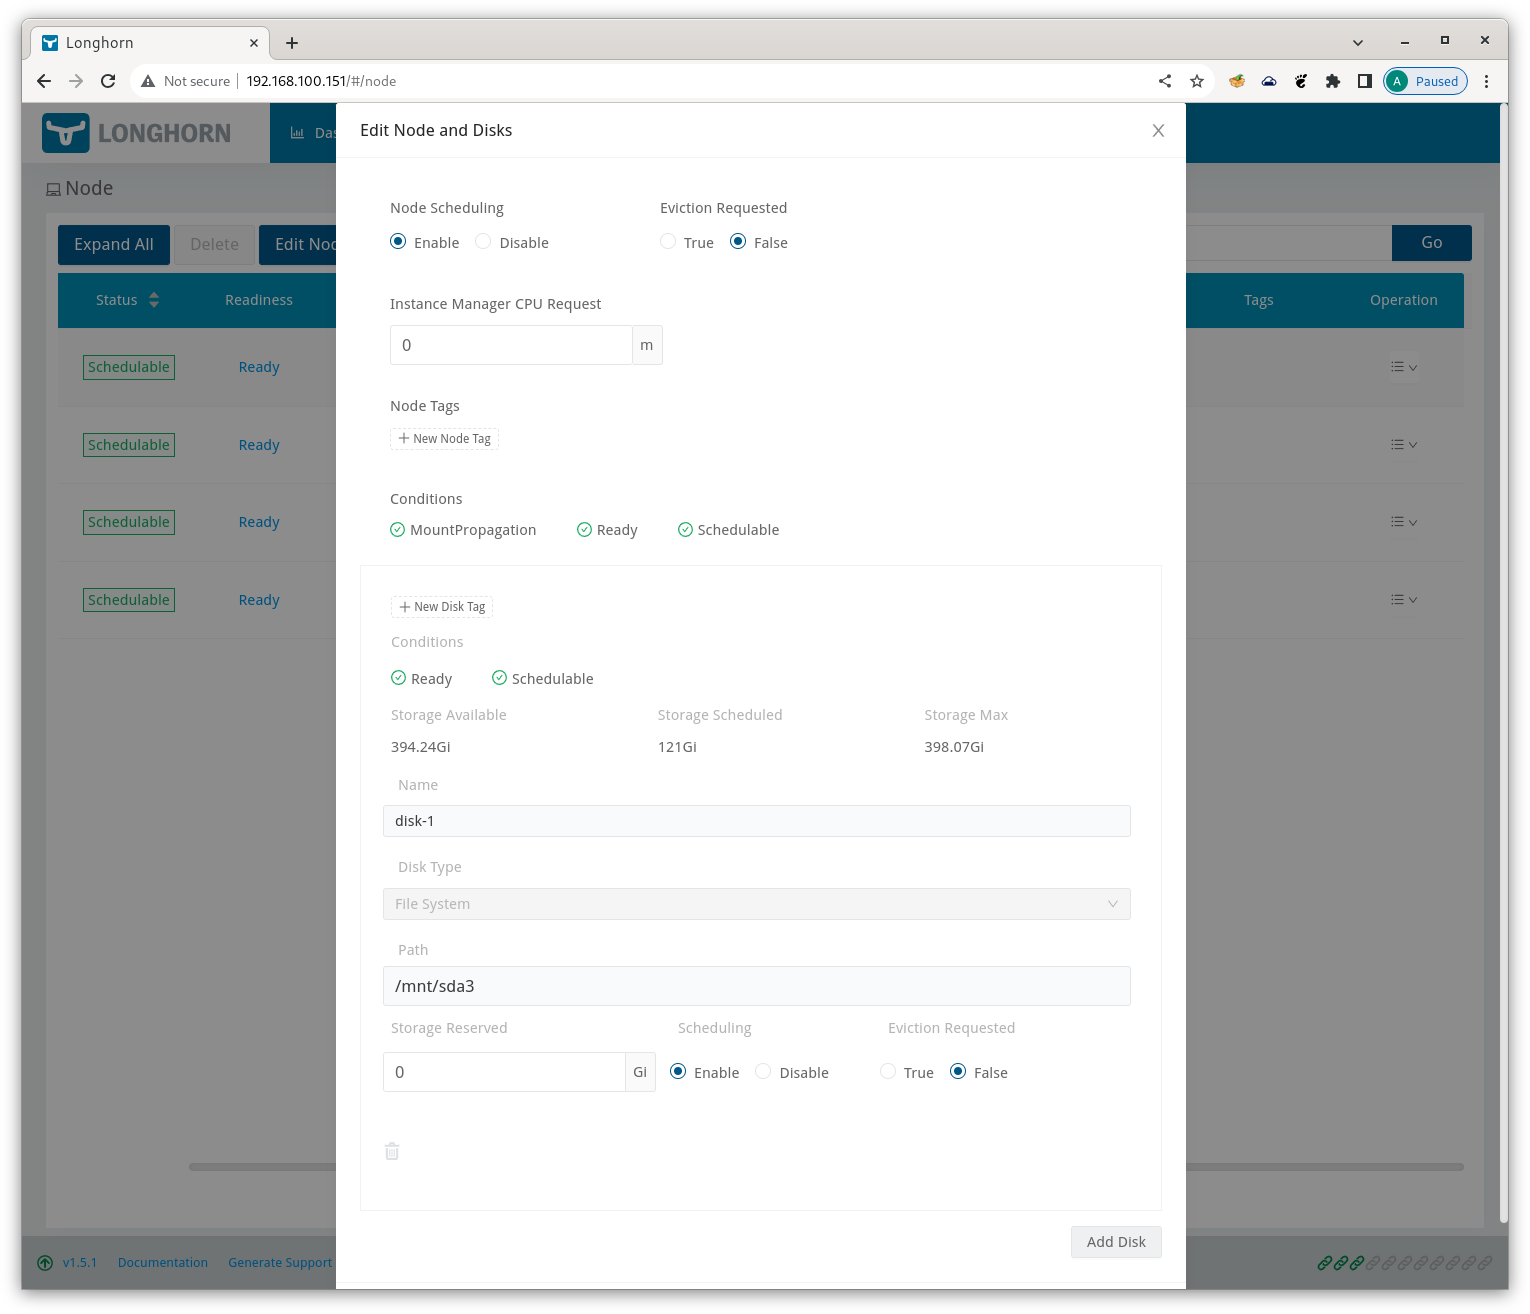 Longhorn Disk Configuration
If you want to remove the default storage volumes allocated in ‘/var/lib/longhorn’, you can disable them and tick ‘Eviction Requested’ in this form.
Now confirm and repeat for the next node.
Making Longhorn the default storage class
Check if you find the file /var/lib/rancher/k3s/server/manifests/local-storage.yaml on the master node.
If you do, run this script to remove ‘default-class’ status from the ‘local storage’ class.
#!/bin/bash
[[ ! -f /var/lib/rancher/k3s/server/manifests/local-storage.yaml ]] && { echo "local-storage.yaml not found."; exit 1; }
sudo cp /var/lib/rancher/k3s/server/manifests/local-storage.yaml /var/lib/rancher/k3s/server/manifests/custom-local-storage.yaml
sudo sed -i -e "s/storageclass.kubernetes.io\/is-default-class: \"true\"/storageclass.kubernetes.io\/is-default-class: \"false\"/g" /var/lib/rancher/k3s/server/manifests/custom-local-storage.yaml

exit 0
Then make longhorn the default storage class :
kubectl -n longhorn-system patch storageclass longhorn -p '{"metadata": {"annotations":{"storageclass.kubernetes.io/is-default-class":"true"}}}'
Now verify that the longhorn storage class has the ‘IsDefaultClass: Yes’ attribute set :
# kubectl -n longhorn-system describe storageclass longhorn
Name:            longhorn
IsDefaultClass:  Yes
Annotations:     longhorn.io/last-applied-configmap=kind: StorageClass
apiVersion: storage.k8s.io/v1
metadata:
  name: longhorn
  annotations:
    storageclass.kubernetes.io/is-default-class: "true"
provisioner: driver.longhorn.io
allowVolumeExpansion: true
reclaimPolicy: "Delete"
volumeBindingMode: Immediate
parameters:
  numberOfReplicas: "3"
  staleReplicaTimeout: "30"
  fromBackup: ""
  fsType: "ext4"
  dataLocality: "disabled"
,storageclass.kubernetes.io/is-default-class=true
Provisioner:           driver.longhorn.io
Parameters:            dataLocality=disabled,fromBackup=,fsType=ext4,numberOfReplicas=3,staleReplicaTimeout=30
AllowVolumeExpansion:  True
MountOptions:          <none>
ReclaimPolicy:         Delete
VolumeBindingMode:     Immediate
Events:                <none>