Installing Minio
Installing the Minio object store
MinIO is an object storage solution that provides an AWS S3-compatible API plus a neat WebUI for managing buckets than can be used for backup and restore, disaster recovery, archive, data lakes for analytics and storing output from data streams.
- Introduction
- Installation of Minio Operator
- Installation of Minio Tenant
- Configuration
- Installation of Minio CLI
Introduction
I recently found Minio quite useful as an enhancement for a relational database that is persisting unstructured information (read: .pdf .docx .xlsx files) attached to workflow items. In a traditional implementation the attachments would be persisted in CLOB columns of a database table. Obviously such an implementation is technically feasible, but - depending on the number and size of attachments - it can result in quite a bit of headache for the DB/A’s (performance and backup-wise).
When i first worked on document management on a large scale (early 90s of the last millenium), we would persist incoming scanned client mail in a file system and only manage the metadata in an RDBMS. Minio would definitely be an improvement over the bare-metal storage systems we used at that time.
For a PoC i plugged a Minio backend into a (Java) REST service that implements the persistence layer for a document-attachment service in a workflow-management system. It took about 300 lines to provide CREATE/READ/DELETE methods. The API was quite straightforward to use.
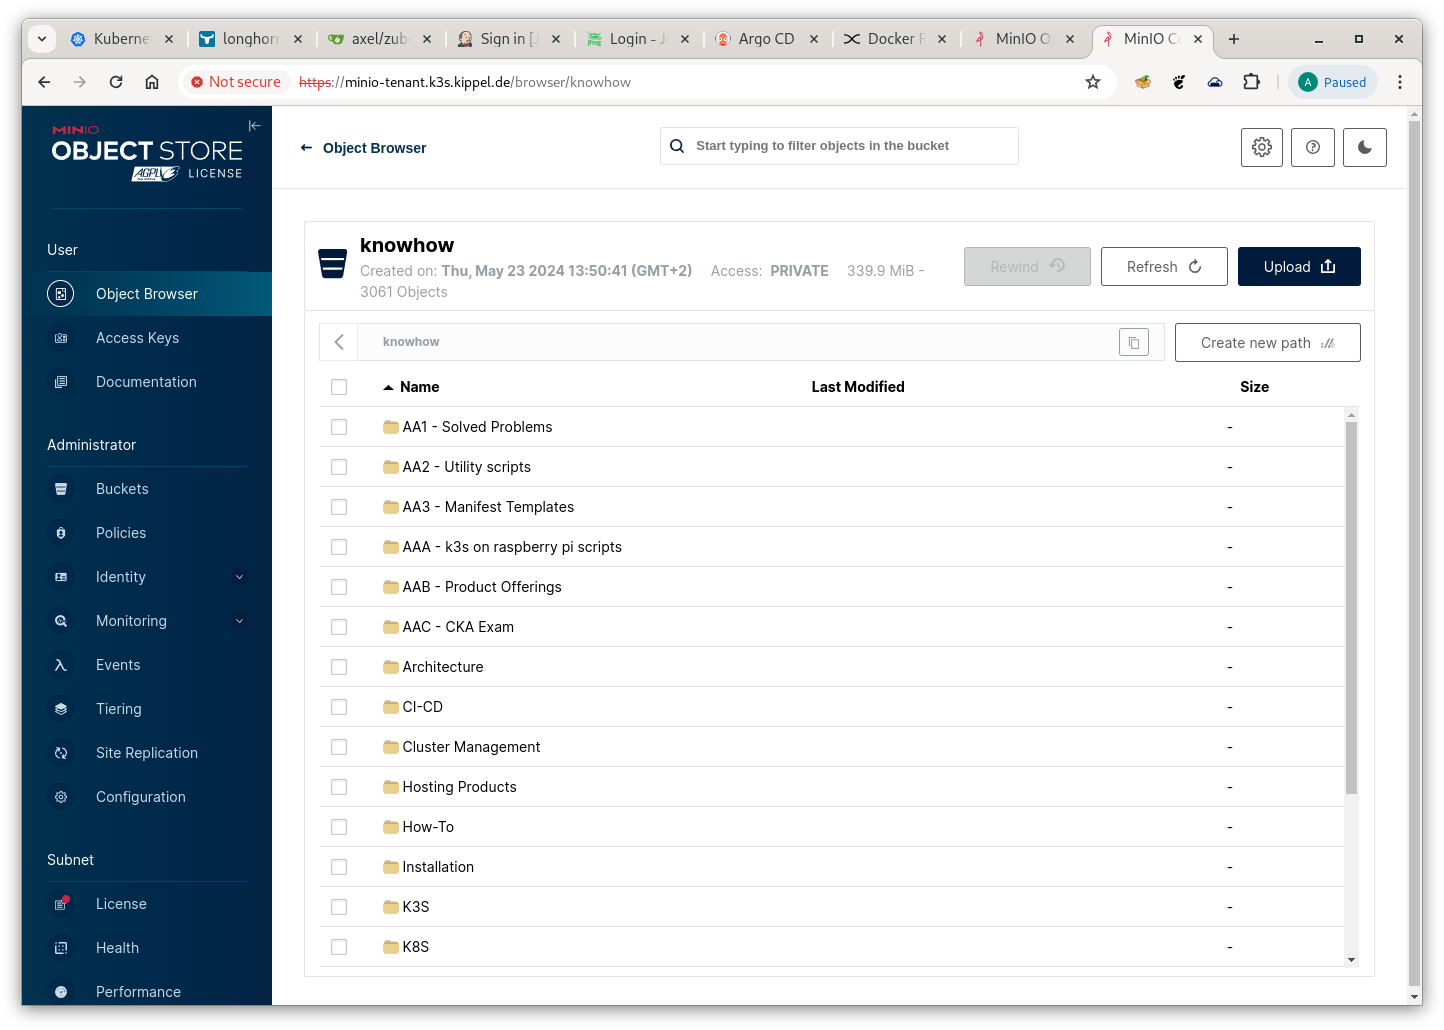
Screenshot of the Minio Object Store Console
Minio consists of 2 architecture components that are installed in sequence.
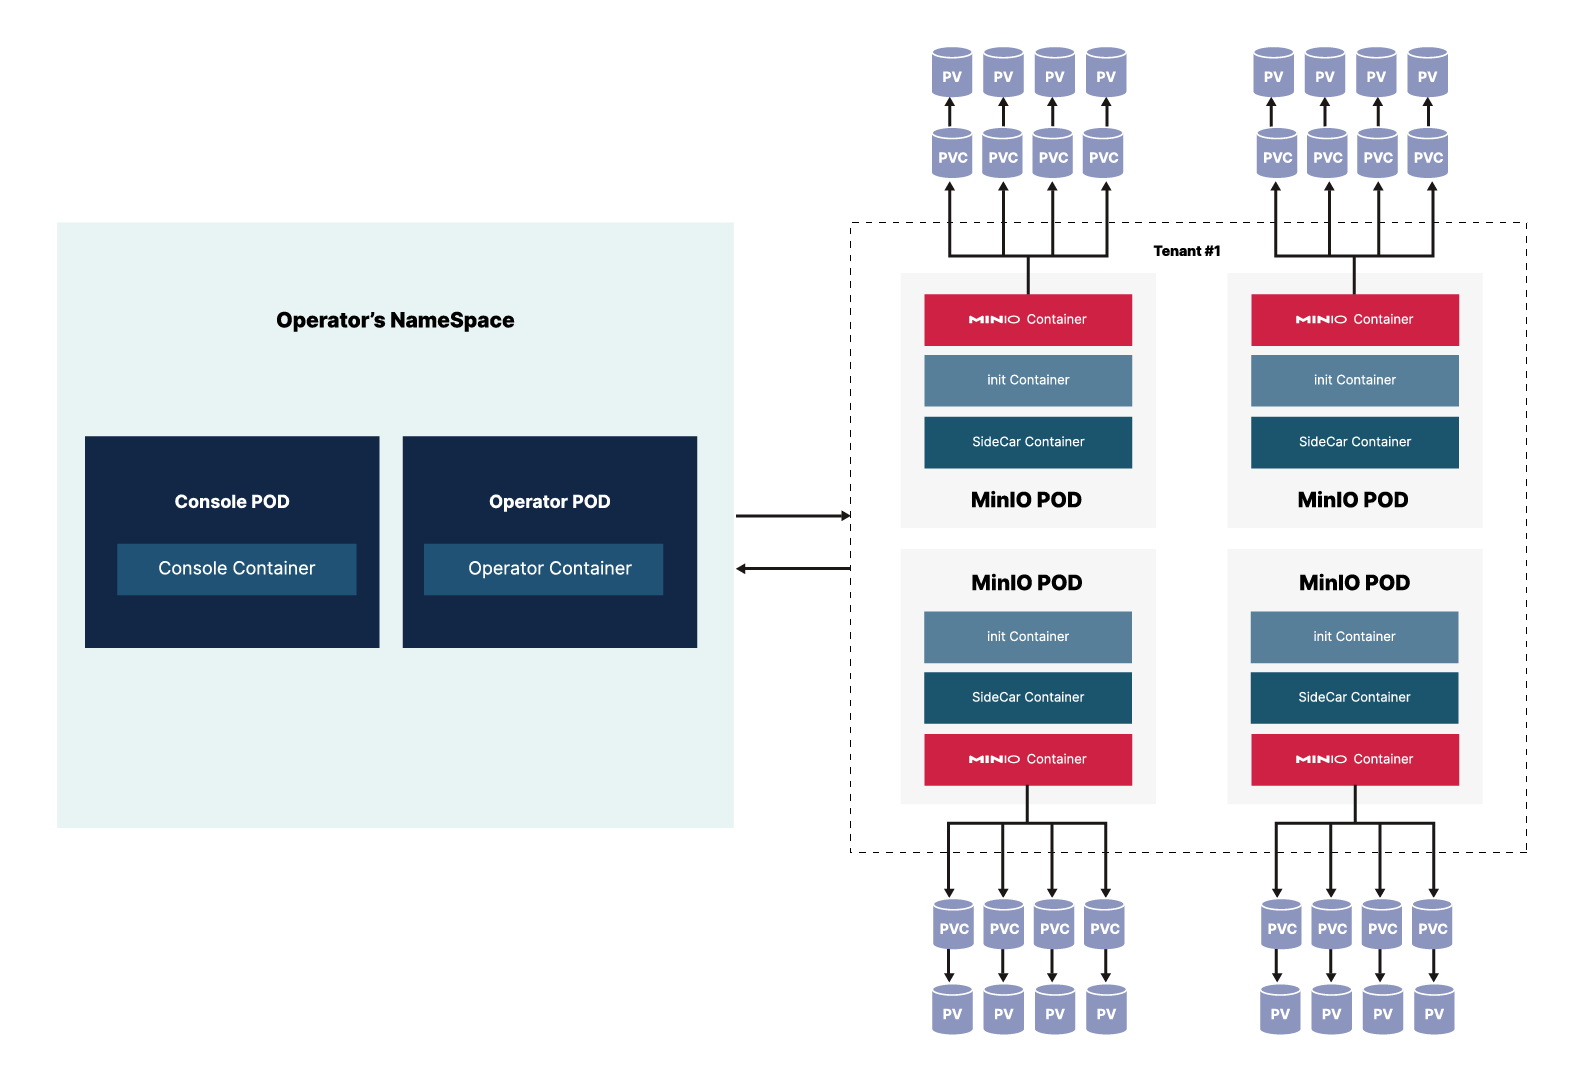
Minio Architecture
The MinIO Kubernetes Operator supports deploying MinIO Tenants onto private and public cloud infrastructures. The MinIO Tenant represents an independent MinIO Object Store.
I decided to install both components with helm (it is feasible to install the minio tenant from the minio operator, but i decided against that), so in a prerequisite step we add the minio repo :
$ helm repo add minio-operator https://operator.min.io
"minio-operator" has been added to your repositories
Now we can check which version is available.
$ helm search repo minio-operator
NAME                         	CHART VERSION	APP VERSION	DESCRIPTION
minio-operator/minio-operator	4.3.7        	v4.3.7     	A Helm chart for MinIO Operator
minio-operator/operator      	5.0.15       	v5.0.15    	A Helm chart for MinIO Operator
minio-operator/tenant        	5.0.15       	v5.0.15    	A Helm chart for MinIO Operator
Installation of Minio Operator
I prefer to have the helm charts available locally, so i usually fetch them, edit values.yaml and then install from the local directory. Let’s go and do that.
$ helm fetch minio-operator/operator --untar=true --untardir=.
operator/
├── Chart.yaml
├── README.md
├── templates
│   ├── console-clusterrolebinding.yaml
│   ├── console-clusterrole.yaml
│   ├── console-configmap.yaml
│   ├── console-deployment.yaml
│   ├── console-ingress.yaml
│   ├── console-secret.yaml
│   ├── console-serviceaccount.yaml
│   ├── console-service.yaml
│   ├── _helpers.tpl
│   ├── job.min.io_jobs.yaml
│   ├── minio.min.io_tenants.yaml
│   ├── NOTES.txt
│   ├── operator-clusterrolebinding.yaml
│   ├── operator-clusterrole.yaml
│   ├── operator-deployment.yaml
│   ├── operator-serviceaccount.yaml
│   ├── operator-service.yaml
│   ├── sts.min.io_policybindings.yaml
│   └── sts-service.yaml
└── values.yaml
I like my cluster to be stand-alone as much as possible, so i copy the images for all applications i deploy into a local registry. That means i had to update the image source in values.yaml. After that i did a clean helm install.
$ helm install --namespace minio-operator --create-namespace   operator -f ./values.yaml .

NAME: operator
LAST DEPLOYED: Tue May 21 20:15:34 2024
NAMESPACE: minio-operator
STATUS: deployed
REVISION: 1
TEST SUITE: None
NOTES:
1. Get the JWT for logging in to the console:
kubectl apply -f - <<EOF
apiVersion: v1
kind: Secret
metadata:
  name: console-sa-secret
  namespace: minio-operator
  annotations:
    kubernetes.io/service-account.name: console-sa
type: kubernetes.io/service-account-token
EOF
kubectl -n minio-operator get secret console-sa-secret -o jsonpath="{.data.token}" | base64 --decode

2. Get the Operator Console URL by running these commands:
  kubectl --namespace minio-operator port-forward svc/console 9090:9090
  echo "Visit the Operator Console at http://127.0.0.1:9090"
Exposing the Minio Operator Console
My standard procedure for exposing static services is to assign them a static IP address from my home network with a MetalLB LoadBalancer Service (i covered the installation here) and add an ip-address/hostname entry to dnsmasq.hosts of the dnsmasq server serving my home network. (I use ingress routes for services that i consider more ephemeral).
Here is the manifest file for the service.
#File: 'minio-operator-console-lb-service.yaml'
apiVersion: v1
kind: Service
metadata:
  labels:
    app: minio-console-lb
  name: minio-console-lb
  namespace: minio-operator
spec:
  type: LoadBalancer
  ports:
  - name: minio-http
    port: 80
    protocol: TCP
    targetPort: 9090
  - name: minio-https
    port: 9443
    protocol: TCP
    targetPort: 9443
  selector:
    app.kubernetes.io/instance: operator-console
    app.kubernetes.io/name: operator
Access to the operator console requires an access token. That is retrieved from the secret console-sa-secret that was deployed along with the rest. Token retrieval works as usual :
kubectl -n minio-operator get secret console-sa-secret -o jsonpath='{.data.token}' | base64 -d
eyJhbGciOiJSUzI1NiIs...DaIVLsEYCW5ww
For the moment we are done with the Minio Operator. Let’s start with tenant installation.
Installation of Minio Tenant
As for the operator, we fetch the tenant helm chart.
$ helm fetch minio-operator/tenant --untar=true --untardir=.

tenant/
├── Chart.yaml
├── README.md
├── templates
│   ├── api-ingress.yaml
│   ├── console-ingress.yaml
│   ├── extra-resources.yaml
│   ├── _helpers.tpl
│   ├── kes-configuration-secret.yaml
│   ├── NOTES.txt
│   ├── tenant-configuration.yaml
│   └── tenant.yaml
└── values.yaml
Interesting Fact: Minio uses a CRD (tenants.minio.min.io) for managing specific tenant aspects. tenant.yaml is the template for that.
In values.yaml i changed :
- the number of servers (2)
- the number of volumes per server (4)
- the volume size (5Gi)
- the storage class name (longhorn). (the ssd’s attached to my cluster nodes are managed by longhorn)
#File: 'values.yaml'
tenant:
  name: miniok3s
  image:
    repository: registry.k3s.kippel.de:5000/base/minio/minio
    tag: RELEASE.2024-05-01T01-11-10Z
    pullPolicy: IfNotPresent
  imagePullSecret: { }
  scheduler: { }
  configuration:
    name: miniok3s-env-configuration
  pools:
    - servers: 2
      name: pool-0
      volumesPerServer: 4
      size: 5Gi
      storageClassName: longhorn
Installation of the tenant with helm is straightforward.
$ helm install --namespace miniok3s --create-namespace tenant -f ./values.yaml .

NAME: tenant
LAST DEPLOYED: Tue May 21 21:09:31 2024
NAMESPACE: minio-tenant
STATUS: deployed
REVISION: 1
TEST SUITE: None
NOTES:
To connect to the minio-tenant tenant if it doesn't have a service exposed, you can port-forward to it by running:

  kubectl --namespace minio-tenant port-forward svc/minio-tenant-console 9443:9443

  Then visit the MinIO Console at https://127.0.0.1:9443
This gives me 2 servers (i.e. tenant pods) managing 4 volumes of 5GB each supplying me with a total of 40 GB of storage.
$ k -n miniok3s get all

NAME                    READY   STATUS    RESTARTS   AGE
pod/miniok3s-pool-0-1   2/2     Running   0          7h20m
pod/miniok3s-pool-0-0   2/2     Running   0          7h19m

NAME                       TYPE           CLUSTER-IP      EXTERNAL-IP       PORT(S)                        AGE
service/minio              ClusterIP      10.43.74.222    <none>            443/TCP                        13d
service/miniok3s-console   ClusterIP      10.43.215.4     <none>            9443/TCP                       13d
service/miniok3s-lb        LoadBalancer   10.43.204.137   192.168.100.165   443:31196/TCP,9000:32751/TCP   13d
service/miniok3s-hl        ClusterIP      None            <none>            9000/TCP,8022/TCP              13d

NAME                               READY   AGE
statefulset.apps/miniok3s-pool-0   2/2     13d
Exposing the Minio Tenant Console
Similar to the operator, the tenant console is exposed with a MetalLB Load Balancer service.
The miniok3s-api clause exposes the Minio API with a cluster-external IP address. This is required when we want to orchestrate the API with the Minio CLI or with an application that implements Minio SDK calls.
#File: 'minio-tenant-console-lb-service.yaml'
apiVersion: v1
kind: Service
metadata:
labels:
app: miniok3s-lb
name: miniok3s-lb
namespace: miniok3s
spec:
type: LoadBalancer
ports:
- name: miniok3s-console
  port: 443
  protocol: TCP
  targetPort: 9443
- name: miniok3s-api
  port: 9000
  protocol: TCP
  targetPort: 9000
  selector:
  v1.min.io/tenant: miniok3s
Configuration
There are 2 activities left to make Minio fully functional.
Minio Tenant User + Password
Login to the Operator with the access token retrieved as outlined above and go to the Configuration tab.
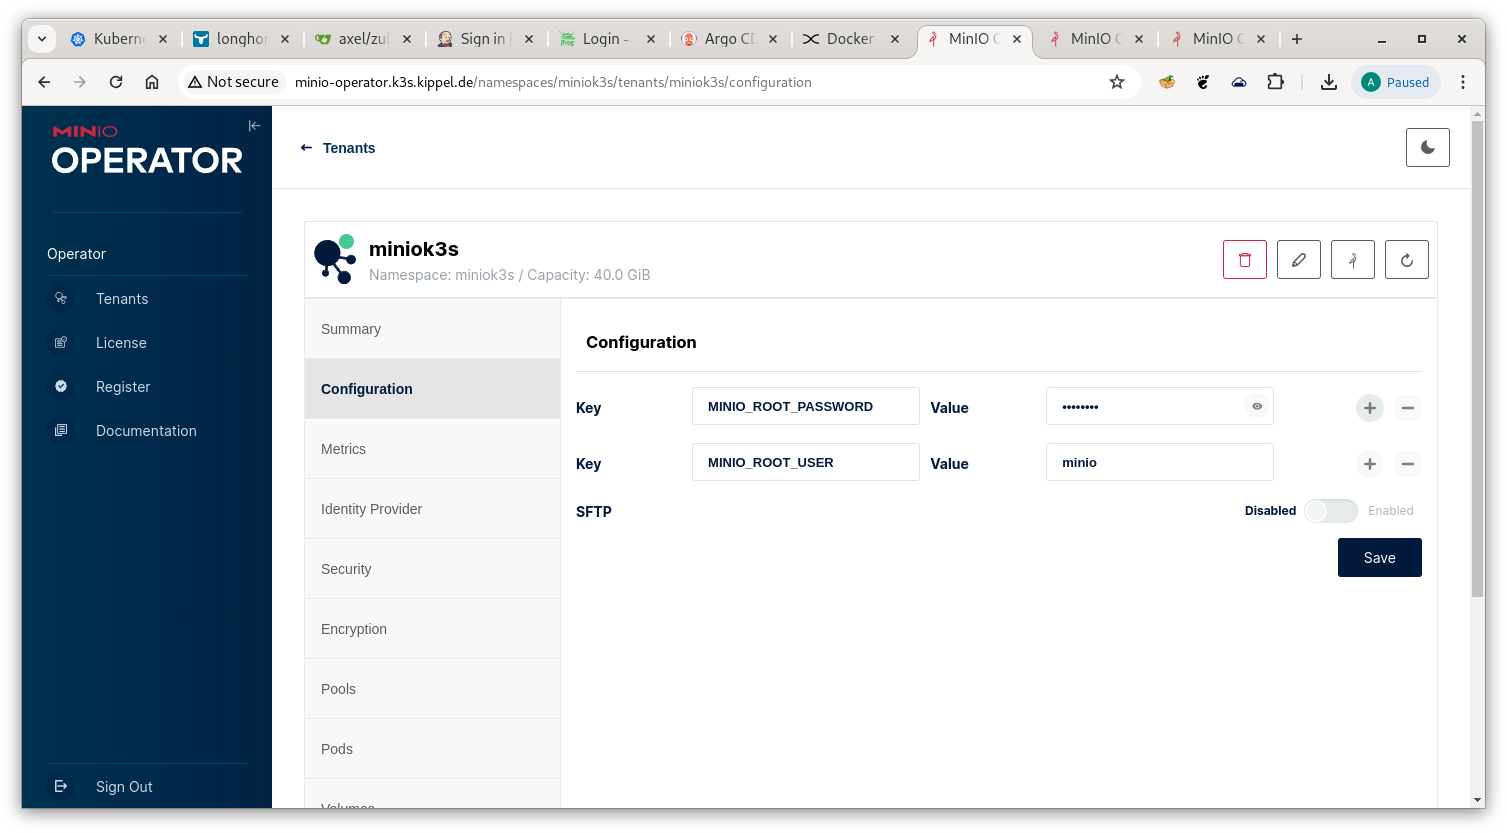
Minio Configuration
Set the values for MINIO_ROOT_USER and MINIO_ROOT_PASSWORD.
Configure custom Minio TLS Certificates
By default Minio uses a certificate provisioned from the (kubernetes-)internal CA at installation time. Since the default certificate lacks the hostname tied to our LoadBalancer service’s IP address, we are going to run into problems whenever we try to login or submit REST requests to the API. We will have to provision a custom certificate that has the hostname of our LoadBalancer service in the SAN (Subject Alternative Name) list. I will cover the details of submitting CSR’s to Kubernetes’ CA in a future article. (Here is a link to the kubernetes documentation) For the moment it should suffice to outline the required steps :
- create a CSR (Certificate Signing Request) with all required SAN items
- submit the CSR to Kubernetes for approval
- download the finished certificate and configure our tenant in the Minio Operator with it
Here is an outline of the CSR (created with openssl req)
Certificate Request:
    Data:
        Version: 1 (0x0)
        Subject: O=system:nodes, CN=system:node:minio.miniok3s.svc.cluster.local
        Subject Public Key Info:
            Public Key Algorithm: rsaEncryption
                Public-Key: (2048 bit)
                Modulus:
                    00:aa:f7:6e:86:00:3f:3f:f9:ee:61:e6:ae:0b:5a:
                    ...
                    39:f9:36:ea:89:d9:da:0f:a5:58:d2:2b:a6:92:89:
                    0d:89
                Exponent: 65537 (0x10001)
        Attributes:
            Requested Extensions:
                X509v3 Basic Constraints:
                    CA:FALSE
                X509v3 Key Usage:
                    Digital Signature, Key Encipherment
                X509v3 Extended Key Usage:
                    TLS Web Server Authentication
                X509v3 Subject Alternative Name:
                    DNS:miniok3s-pool-0-{0...1}.miniok3s-hl.miniok3s.svc.cluster.local, DNS:minio.miniok3s.svc.cluster.local, DNS:minio.miniok3s, DNS:minio.miniok3s.svc, DNS:*.miniok3s-hl.miniok3s.svc.cluster.local, DNS:*.miniok3s.svc.cluster.local, DNS:minio-tenant.k3s.kippel.de
    Signature Algorithm: sha256WithRSAEncryption
    Signature Value:
        0b:a8:fa:30:20:25:e5:96:01:2a:65:a9:ca:95:a5:47:25:b0:
        ...
        24:c0:78:9e:37:85:f7:a2:7b:65:96:7d:22:04:69:e3:85:0e:
        77:20:a3:e5
#File: `minio-custom-certificate.csr`
apiVersion: certificates.k8s.io/v1
kind: CertificateSigningRequest
spec:
  request: "$(cat $csrfile | base64 -w0)"
  expirationSeconds: 31622400
  signerName: kubernetes.io/kubelet-serving
  usages:
  - digital signature
  - key encipherment
  - server auth
I spent quite a while figuring out the details. To save you the time :
- key usage must be : digital signature, key encipherment, server auth
- the openssl csr must be embedded base64-encoded after the
requesttag - the signer must be
kubernetes.io/kubelet-serving - don’t make
expirationSecondstoo small. i picked 366*86400s (i.e. 1 year).
After the csr’s state is Approved, Issued, you can download the certificate and add it to Minio Server Certificates in the Security tab of the operator console.
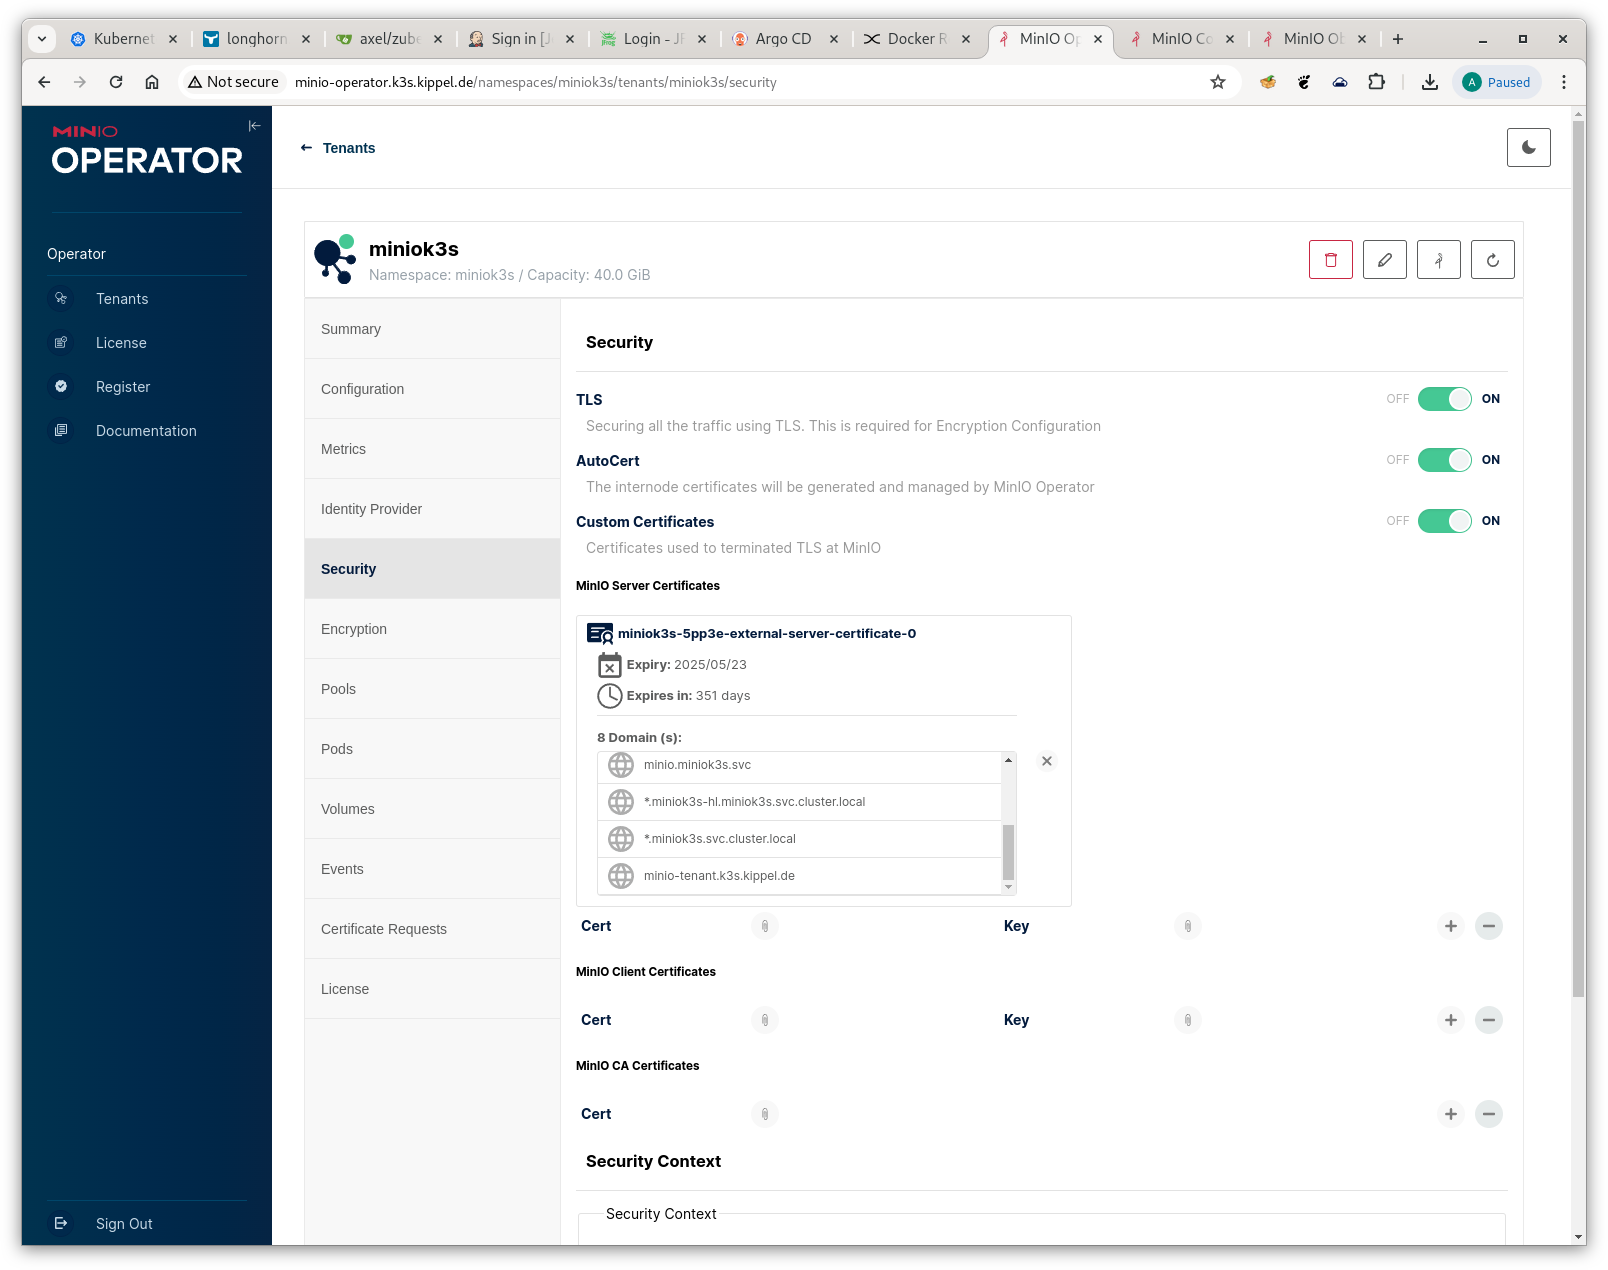
Minio Server Certificate Configuration
With this activity complete, you should now be able to login to the Minio Tenant console.
Installation of Minio CLI
Minio comes with a CLI that facilitates automation of largescale change activities. Installation is by downloading from a download site and copying the executable to a proper destination directory.
CAVEAT: be careful to pick the correct architecture (arm64/amd) for your platform !
wget https://dl.min.io/client/mc/release/linux-arm64/mc -O $HOME/bin/mc
chmod 700 $HOME/bin/mc
Login to the Minio Tenant Console, go the tab Access Keys and hit Create access key in the north-east corner then copy/paste the credentials into ~/.mc/config.json
// file: "~/.mc/config.json"
{
	"version": "10",
	"aliases": {
		"miniok3s": {
			"url": "https://minio-tenant.k3s.kippel.de:9000",
			"accessKey": "***",
			"secretKey": "***",
			"api": "S3v4",
			"path": "auto"
		}
	}
}
Verify that your access works
(even with our certificate in place we have to disable SSL verification with --insecure)
$ mc --insecure admin info miniok3s
●  miniok3s-pool-0-0.miniok3s-hl.miniok3s.svc.cluster.local:9000
   Uptime: 41 minutes
   Version: 2024-05-01T01:11:10Z
   Network: 2/2 OK
   Drives: 4/4 OK
   Pool: 1

●  miniok3s-pool-0-1.miniok3s-hl.miniok3s.svc.cluster.local:9000
   Uptime: 41 minutes
   Version: 2024-05-01T01:11:10Z
   Network: 2/2 OK
   Drives: 4/4 OK
   Pool: 1

Pools:
   1st, Erasure sets: 1, Drives per erasure set: 8

343 MiB Used, 2 Buckets, 3,066 Objects
8 drives online, 0 drives offline, EC:4
The CLI exposes all API functions supported by minio.
Here are are some example commands.
# creating a new bucket
minioclient mb miniok3s/knowhow
Bucket created successfully `miniok3s/knowhow`.

# List the created bucket:
minioclient ls miniok3s
[2024-04-20 23:34:48 CEST]     0B knowhow/

# Copy everything recursively from the local directory to the destination
minioclient cp -r . miniok3s/knowhow

# Check minio liveness
minioclient ping miniok3s

1: http://minio.k3s.kippel.de:9000 min=2.18ms max=2.18ms average=2.18ms errors=0 roundtrip=2.18ms
2: http://minio.k3s.kippel.de:9000 min=1.69ms max=2.18ms average=1.93ms errors=0 roundtrip=1.69ms
3: http://minio.k3s.kippel.de:9000 min=1.69ms max=2.22ms average=2.03ms errors=0 roundtrip=2.22ms
I hope you enjoyed this week’s article. Stay tuned for more !